In This Article

Accidents happen; a dropped phone or even a screen failure can end up leaving your data inaccessible. Most of the users end up in a panic situation as their photos from memorable moments or messages containing critical information are inaccessible on a broken and damaged device. Recovering this information requires careful steps rather than guessing or random methods.
Many times, cloud backups or data sync can help rescue some information. The crucial step is to approach the whole recovery process step-by-step, rather than panicking and aimlessly trying random solutions off the internet.
We have created this guide that will walk you through proven methods from simple built-in backups to professional and trusted recovery tools like Dr.Fone Android recovery software that can help you extract data safely with a better probability of restoring data without causing additional damage.
1. Diagnose Android Phone Damage Without Losing More Data

When your Android device is broken, it is essential to carefully assess the damage, which is the first step to recover your data. There are some don’ts and common mistakes that you must need to avoid.
You should avoid any attempt to restart or power on your device; doing so can worsen internal damage and corrupt files. There are users who immediately opt for DIY fixes, but trial and error do more harm than good, and there are chances of some DIYs causing permanent data loss.
Instead, you need to physically assess and observe the responsiveness of your device. Pay extra attention to the phone’s screen. Does the phone make any sound or vibration, or show any LED indication (if there is any)? You may also check the charging port and evaluate the charging behavior. If your phone supports wireless charging, then you may try that as well.
Checking if the device powers on or connects to a computer helps determine the safest recovery path. Each of these early assessments is important for a successful broken Android data extraction later.
We will highly recommend that you document any visible damage, as this may guide whether backups or professional tools are necessary. Moreover, you may want to avoid pressing multiple buttons or installing unverified apps, which may trigger errors or cause system failure that could worsen the situation.
Also, keeping the battery stable and not forcing connections preserves the phone’s integrity.
2. Recover Broken Android Data Using Cloud Sync and Backups
Once the damage has been diagnosed, the next step is the recovery phase, where we will be using cloud backup data to attempt data recovery. What’s interesting about cloud storage services is that it automatically creates a backup of all your important data, including photos, videos, and even messages.
Moreover, to be able to better understand how to recover data from a broken phone, the very first step is to check all the synced accounts. So, let’s see how cloud sync simplifies early data recovery:
a. Use Google Sync Account to Restore Data
Google Sync automatically stores contacts and even app data linked to your account. If your phone screen is broken but the account is active, you can access files from another device. This feature reduces recovery pressure and supports smoother broken Android data extraction. Yet, users need correct account access to retrieve contacts, photos, and app data. So, go through the steps to check sync settings and restore available data:
Instructions. Open “Settings” on your functioning phone and head to “Accounts.” Select “Google” to sign in using the same account from the damaged device. Following this, you need to turn on sync for the data you want back.

b. Utilize Google Backup to Restore Data on a New Android
When your phone becomes unusable, Google Backup lets you restore files on a new device. It keeps app data, messages, call logs, and settings secure in your Google account. Plus, signing into the same account allows data restoration during initial phone setup. While learning how to recover data from a broken phone, let’s explore how to use this method:
- While setting up your phone, continue from the “Copy Apps & Data” screen. After that, select “Can’t Use Old Device,” then sign in using the same Google account.

- After the backups load, select the latest backup file to choose the desired data and tap “Restore.”


3. Access Broken Android Data Using USB or Device Connection
In case the phone powers on, connection-based access becomes the safest recovery choice. A stable USB link allows computers to recognize storage without stressing internal components. Yet, avoid repeated plugging or forceful insertion, as unstable connections might corrupt data. If your phone screen remains visible, enable File Transfer mode from the notification panel. This helps your system recognize internal storage and access essential files.
For devices with minor touch issues, consider using a mouse through an OTG adapter. A steady connection allows you to copy documents and data before deeper recovery attempts. However, if the system fails to read the device, software-based methods can help. In such cases, professional utilities like Dr.Fone Android Recovery software guide users to extract data.
4. When Software Recovery Becomes the Practical Option
There are instances when manual or cloud recovery fails to help recover data, and that is exactly when a dedicated software recovery tool becomes the most practical option. These tools are designed to handle complex, broken Android data extraction professionally without damaging the system.
Below, we have created a quick comparison table to help you with the guidance regarding the suitable recovery tool selection:
| Situation | Device Condition | Why Software Recovery Helps |
| Screen Partially Broken | The phone powers on, but touch response is unstable | The software can access data without relying on screen interaction |
| USB Connection Unstable | The device connects but disconnects frequently | Recovery tools use guided processes to stabilize communication |
| Files Not Visible Manually | Storage is detected, but files are inaccessible | The software scans deeper system areas safely |
| Basic Methods Failed | Backups and sync did not restore the data | The tools provide advanced recovery options when basic methods fail |
| User Lacks Technical Skills | The user fears making mistakes during recovery | Guided interfaces reduce errors and stress |
5. Step-by-Step Guide to Recover Broken Android Data with Dr.Fone
When earlier recovery methods fail, users need a reliable guided solution. Broken phones create stress, especially when screens fail or touch stops responding. At this stage, Dr.Fone – Data Recovery (Android) offers a calm, step-driven recovery approach. It supports 6,000+ Android brands, including Samsung and Xiaomi, worldwide. This makes Dr.Fone Android recovery software suitable for non-technical users.

In addition, recovery works even when screens are cracked, but touch input fails. Users can control broken phones from computers using a mouse and a keyboard. Plus, no root access or USB debugging is required during the recovery process steps. Alongside, recoverable files can be scanned and previewed before recovery starts fully. This dedicated tool delivers one of the highest data recovery success rates today.
Key Features
- Selective Recovery: Allows choosing specific files to restore instead of everything at once.
- File Support: Recovers over 14 file types, including multimedia and contacts.
- WhatsApp Recovery: Retrieves deleted WhatsApp chats and even “View Once” media.
Quick Guide to Recover Broken Android Data with Dr.Fone
Once you understand the tool’s features, it’s time to begin actual recovery. Now, let’s explore the steps to learn how to recover data from a broken phone with Dr.Fone:
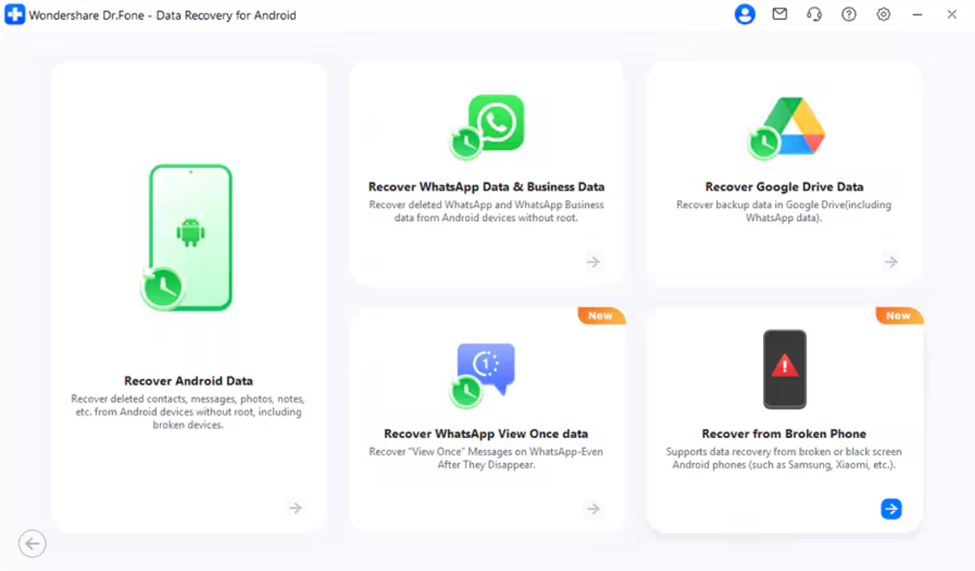
1. Launch the Broken Phone Recovery Feature: As you go to the “Toolbox” tab, choose “Data Recovery” and select “Android.” Then, click “Recover from Broken Phone” to move to the next step.
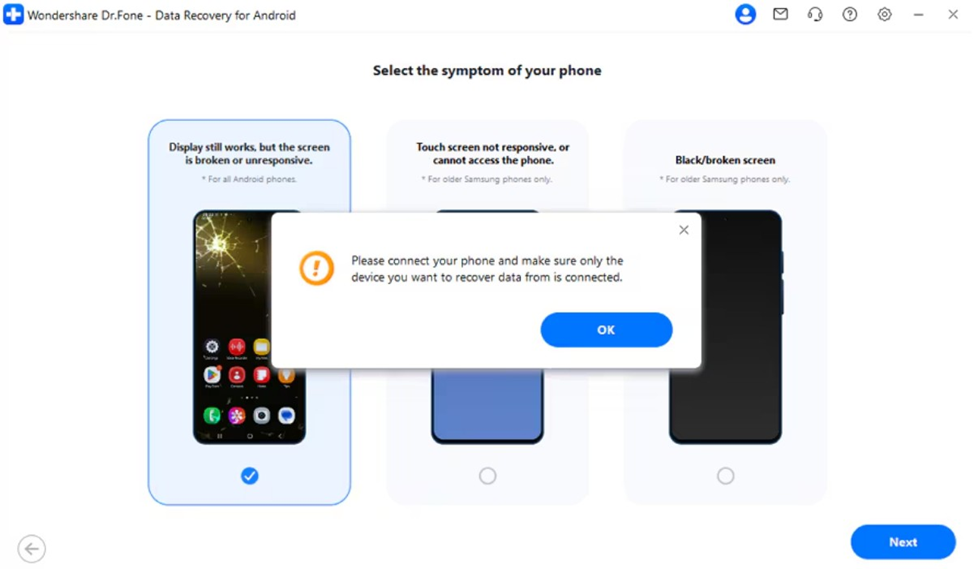
2. Specify Your Phone’s Condition: Choose the “Display Still Works, But the Screen Is Broken or Unresponsive” option. Here, press “Next” to connect your broken device and confirm with “OK.”
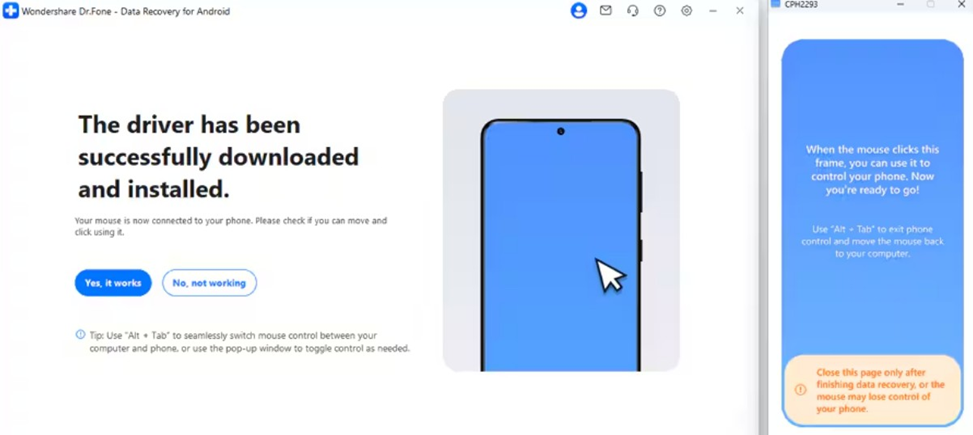
3. Retrieve Data from the Broken Device: You will then need to allow the tool to install the required drivers. Upon seeing a dialog box, select “Yes, It Works” to restore your files.
Concluding Notes
To conclude, it is important to remind ourselves that a broken Android phone doesn’t mean all the data has been lost. The majority of the data and information remains on the device storage and can be recovered by opting for the right approach.
Recovering data from a broken phone or tablet device needs patience. In this blog post, you have already explored and learned all the ins and outs, as well as where to begin and how to use backups to protect files from loss or damage.
Moreover, you should also avoid repeated restarts and risky DIY experiments as these will help maintain your phone’s overall stability. And with a proper backup properly set up on your devices, future phone damages sustain significantly less data loss.
When basic recovery methods fail, using a guided professional recovery tool is what ensures reliable results. That’s why Dr.Fone Android recovery software is the optimum choice for safe and complete data recovery.


